

DOME PROJECTIONS
- by Joanie Lemercier
- in Non classé
- posted May 2, 2014

The Satosphere is a 18 meters diameter dome on the roof of the Society for Arts and Technology [SAT] in Montreal. It opened in 2011, and has a 360° x 210° spherical screen, equipped with 8 video projectors, 157 speakers, and has a team of designers and technicians working in the space, doing content creation as well as active R&D on immersive technologies and contents.
I was invited as part of the artist residency program to develop an audiovisual piece that premièred in May 2014.
I spent about a month in the dome, doing extensive tests and research, as well as rehearsals and a lot of fine tuning, and I’d like to share some of my findings, which could be useful if you’re working in a similar environment.
Working with such format implies new rules, here are a few things I discovered during the residency.
1- LENS AND FRAMING
While the immersive aspect or dome projections brings amazing new possibilities, you also loose one of the most interesting element that a century of film making has brought to us: framing, and the use of different camera lenses. To create content for the dome, you’ll need to use a ‘fixed lens’, and capture in every direction.
In fact, the audience won’t be able to see the whole image at once without moving their head (the human vision only covers 120° horizontally), so you’ll have to reconsider how you bring elements into focus, and rethink how you compose your scenes, so the audience does’t miss things.
2- RESOLUTION
With a much larger projection area to cover than a classic screen, a dome projection will also require more pixels and resolution.
A 4 Million pixels resolution (dome master 2048*2048) is very acceptable, and allows real-time content. Keep an eye on your anti-aliasing settings, as thin/detailed objects might look terrible, especially by the base of the dome.
9 Million pixels (dome master 3072*3072) is obviously much nicer, but might take more than twice the time to process / render.
The most advanced dome system today runs at 56 Million pixels.
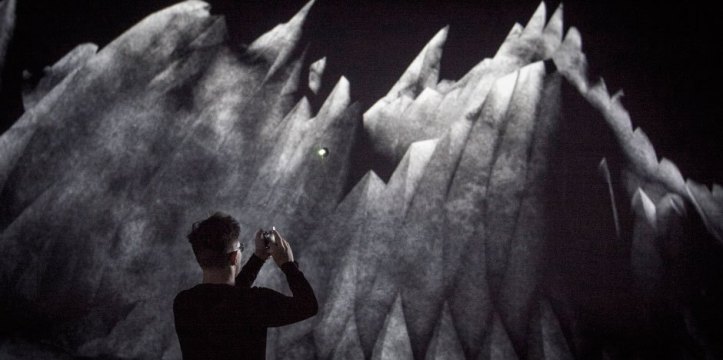
3- THE IMPORTANCE OF CONTRASTS AND BLACKS.
For me this was the main technical constraint (and struggle), and it had a major influence on the piece.
As the screen is spherical, a lot of the projected light bounces off the white surface and lights up the entire room. Then all black becomes grey.

this balance of white / black seems to give the best results
pictures from the show ‘Dromos‘, courtesy of SAT/Sebastien Roy.
content brightness reveals the screen
the grey area (above tripod) should be black
In order to keep a decent contrast, the average level of bright pixels has to stay low, and large bright areas must be avoided (ie: bright skies).
This partly explains why wireframe and particles aesthetics work so well and are still a bit overused today.
One solution is to blend content with noise textures, in order to reduce brightness and add grain to flat coloured areas.


4- UNUSUAL TEMPLATES
As the dome screen is anything but a rectangular screen, you have to be prepared to explore and juggle with video templates and formats.
Here are the 3 common formats I used for the project:
PANORAMA
++ contains full 360*360 perspective. distortion on zenith and nadir.
++ file optimization: GOOD, all pixels are used.
– – non standard camera, might require plugin.
HOW: in cinema4d, use quicktime VR export.
CUBEMAP
++ contains full 360*360 perspective. no distortion.
++ camera setup is easy to create in any software. convenient.
– – file optimization: BAD, only half of the pixels of the template are used.
– – broken perspective / hard to edit.
HOW: cinema4d
FISHEYE / DOMEMASTER
++ standard for diffusion
++ consistent perspective, easier to edit.
– – non standard camera, might require plugin.
– – distortion on circle perimeter.
– – file optimization: OK, 78% of the pixels are used.
HOW: WFcam4D plugin required in cinema4d
Below: Shots of Montreal in Panorama, Cubemap and 210° fisheye.


5- OTHER CONSTRAINTS
MOTION / CAMERA MOVEMENT: Keep in mind that one centimetre on your computer screen, might actually represent a projection of one meter in the actual space. Avoid very fast camera moves, always keep in mind the scale of the projection. If you have a lot of movement, prefer higher frame rates. Avoid 24-25fps, and always prefer a 30, 60 or 120 fps (or a multiple of the projectors’ frequency).
PERSPECTIVE / ANAMORPHOSIS
As opposed to a cinema screen, the perspective of the images doesn’t look the same depending on your position in the room. People on the sides will see the image more stretched:


If you’re interested in projectors setup and calibration for dome displays, you can find extensive documentation on Paul Bourke’s website.
Hope these will be useful to you, feel free to ask questions or requests in the comments.
Recent Comments