0

Votre panier est vide.

Tutorial: Origami and projection mapping

I’ve been doing creative workshops with kids and schools for years (with 8-10 years old) and this can be an easy and creative activity to do at home during the confinement.

All you need to make the sculpture is paper, tape, and a bit of time.
For the mapping part, you’ll need a projector and computer to animate your origamis with light (video Part 2, coming soon).

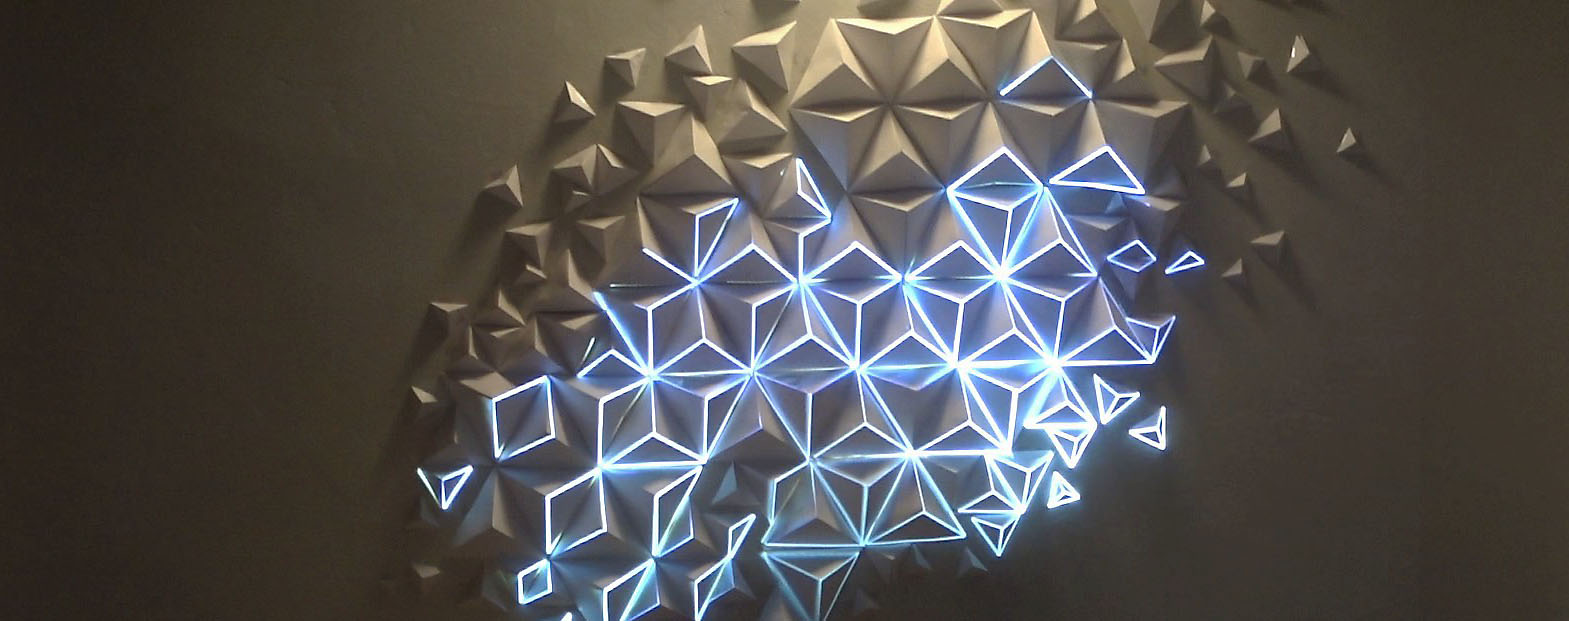
This tutorial is based my series “Paper and light“.


PART 1: ORIGAMI

PART 1
PART 2

Here’s the tutorial in French / tuto en Francais.


PAPER FOLDING: STEPS

STEP 1
STEP 4
STEP 2
STEP 5
STEP 3
STEP 6


Now, make as many as you can.

PART 2: Projection mapping.


In order to demonstrate the principle of projection mapping, I slightly modified the code from Method draw, a tool developed by Mark MacKay. It works in any computer and browser.

https://joanielemercier.com/mapping/

Instructions:

1- Setup your projector

  • Install and plug projector (it must be stable and NOT MOVE at all).
  • Make sure the projection area covers the origami.
  • Focus image.
  • Connect your computer (you may use duplicate or extend mode).

2- Open the mapping tool in a browser (I use chrome) in full screen mode (F11).
On a Mac, it’s “Apple + ctrl + F”.

Select the canvas size on the right, to match your projector resolution (often 1920*1080).
That’s it, you’re all set !

3- Trace the edges
Select the Line tool (shortcut: L).
Place your cursor on a corner,
Click and drag to the next corner. Repeat.

Use Select (V) to select and move elements.
You can save your progress as an .svg file.
Repeat until the entire structure is mapped.

4- Animation mode
When all lines are traced, you can switch to the animation mode:

  • Press “Space” to hide all menus.
  • Press “N” to turn the ‘noise animation’ on. It’s a generative mask that hides some of the lines.

    Thanks Patricio Gonzalez Vivo for the shader code !

What else ?
If you’re a developer and if you know html, CSS and javascript, feel free to get in touch to give me a hand to develop more animations and options to this simple software.

Feel free to save and export your mapping (save SVG in the menu).
You can also use other mapping softwares such as Madmapper, HeavyM (they both have demo versions) or any animation software to go beyond this tutorial.

Please send me some pictures of your compositions on our facebook page !

Comments

  • Joe Brailsford

    mars 25, 2020 at 11:29

    Hey. This is amazing! Could you do a quick video on how you mapped the structure in the computer? Are you using resolume? Keep up the great work!!

  • Patrick Whitty-Clarke

    mars 27, 2020 at 1:08

    Hey Joaniele,

    This is excellent, thanks for sharing this! I’m going to give this a go soon.

    PS: I saw your installation in London a few weeks ago, it was really good

  • Chris Dennett

    avril 9, 2020 at 1:22

    Thanks so much for this, my daughter and I have been looking for interesting art projects to do together. She’s into origami and I’m a web dev into SVG and want to try projection mapping!! So this feels perfect. We’ll post our results when we’re done! Soooooo exciting. Merci beaucoup.

  • Suzanne

    avril 9, 2020 at 10:38

    Thank you for this. I would like to try this with my daughter however we don’t have a projector. Will any projector work or is there a specific kind?

  • Paco Angeles

    avril 10, 2020 at 7:03

    Hi Joanie, I really love your art, it’s super amazing, you have really inspired me to be into projection mapping, thank you so much for share, I dream to have the chance to see your artworks in real life someday. Thanks Joanie

  • Mapping vidéo & Origami – Make!

    avril 11, 2020 at 9:57

    […] La procédure complète est disponible sur le site de Joanie Lemercier : https://joanielemercier.com/origami/ […]

  • Rubén

    avril 26, 2020 at 6:25

    Thanks for sharing this. It’s a pleasure to learn some processes that you use. Amazing work.

  • Gabrielle

    mai 8, 2020 at 9:02

    I have been wanting to dabble in Projection mapping for years and your easy to understand and simple instructions allowed me to finally complete my first project. I am so thrilled and grateful for you sharing this. Please create more tutorials.

  • Soumik Pal

    mai 17, 2020 at 6:43

    Thanks so much for this detailed tutorial! I’ve got everything up and running for my setup and am enjoying how easy it is to use your mapping software. I have one question – is it possible to make a custom shape and then fill it in with a color? My triangles are not all equilateral, but I would love to try playing with some color fill/blocking patterns. It seems all the preset shapes do not fit my needs quite right, I was hoping there is some way to create a custom shape using lines and then fill it in, similar to paint bucket tool in Photoshop? Let me know your thoughts and if you may be planning to add something like this to the software? I can provide video if unclear. Appreciate it again.

  • Martin

    juin 30, 2020 at 5:33

    Dear M. Lemercier, many thanks for the great project.

  • Imanol Zubiauz

    avril 13, 2021 at 1:55

    Thank you very much Joanie! I used to work with Resolume but your software is better and easier to do a workshop of a few hours. I am teaching art with young students and they love it.

  • Capstone Journal in Progress – A L I E N J U P I T E R

    octobre 21, 2022 at 11:18

    […] Tutorial: Origami and projection mapping […]

  • Chris

    décembre 30, 2022 at 9:56

    Hey,
    I live that project. Is that code on GitHub or somewhere else.
    I like to to support that code.

    Best regards
    Chris

Votre adresse e-mail ne sera pas publiée. Les champs obligatoires sont indiqués avec *